


FAQ & Tips
Check our FAQ for problems and questions.

intarsys products
Partner products
General topics
intarsys products
General (install, license...)
Since January 1.1.2024st, XNUMX, Sign Live! CC in the signature process when using certain algorithms that they have expired. The background is that the signature creation settings are set to the outdated “SigG” testing standard.
Workaround: Reset this setting to “Standard”. Then the error should no longer occur.
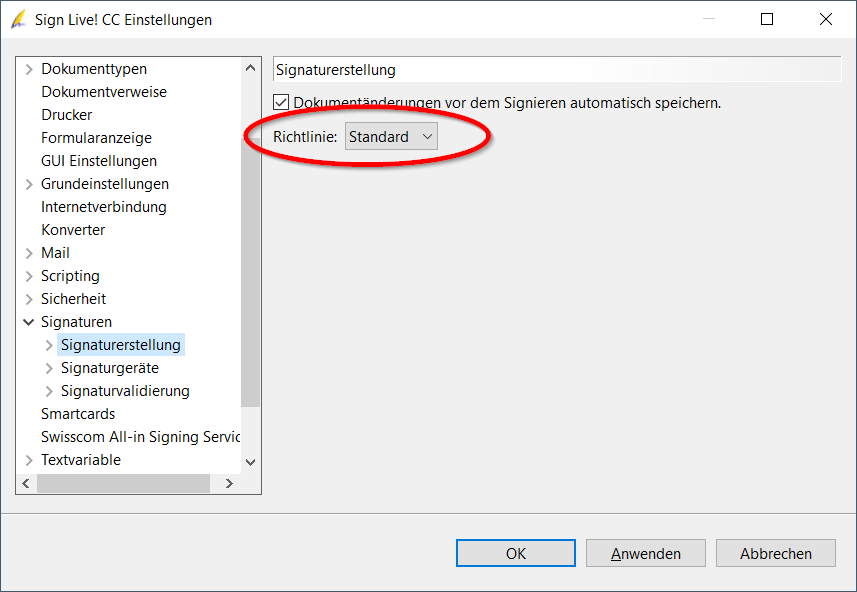
If the problem persists, please send a description of the error and the current log file an support@intarsys.de.
The warning in the SLCC settings pages (Tools > Settings > Signature Devices > …) still appears.
The problem has been completely resolved by using the corrected version of Sign Live! CC 7.1.11.3 (for download) or from 7.1.12.
What does Sign Live! CC implements the valid catalog of algorithms"?
An algorithm catalog defines which cryptographic algorithms are currently and for a future period considered secure. In doing so, it largely defines the security level of a PKI(1).
Until June 30.06.2017, 01.07.2017, the Signature Act and the Signature Ordinance (SigG/SigV) defined a PKI for qualified electronic signatures and required an algorithm catalog that was constantly updated. Since July XNUMXst, XNUMX, this has been done throughout Europe in the eIDAS regulation regulated.
The BSI (Federal Office for Information Security) creates the algorithm catalog based on a 7-year forecast. This means that the algorithms under consideration can be considered safe today and will most likely continue to be safe for at least the next 7 years. Very often these periods are extended every year. If it is expected that an algorithm will become unsafe, users have a warning period of 7 years. It has not happened since the existence of the SigG algorithm catalog that known attacks suddenly endanger the security level of crypto algorithms so much that a validity period had to be shortened.
Sign Live! CC implements the specifications of the algorithm catalog valid at the time of publication of the software.
What happens to the algorithm catalog through the implementation of the eIDAS-VO?
To the eIDAS regulation implemented in Germany, SigG/SigV will be replaced by the Trust Services Act and the associated ordinance at the end of 2017. An algorithm catalog is e.g. Currently not anchored in the eIDAS-VO. It is still unclear whether the EU administration will decide on the necessary rules at EU level by then or whether Germany will continue to stick to the German catalog as long as there is no EU catalogue. We will keep you informed on this topic.
(1) PKI = Public Key Infrastructure. For detailed information see https://de.wikipedia.org/wiki/Public-Key-Infrastruktur
In rare cases it happens that Sign Live! C.C.C or Sign Live! cloud suite bridge not start after the installation and that the following error message appears with possible error causes:
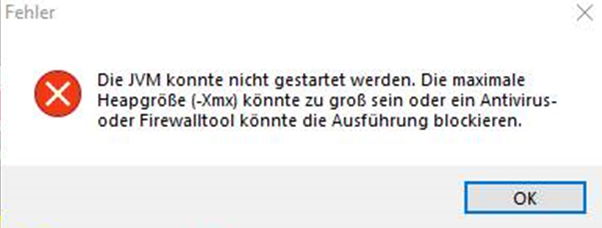
Practice has shown that the causes of error listed in the error message often do not lead to a solution to the problem. Another possible cause is that a required Microsoft Visual C++ runtime library is missing or outdated.
This runtime library is available in the Microsoft Visual C++ Redistributable package.
Please check the Windows settings under "Apps and Features" to see whether the current version of this software package is available on your computer.
Es wird at least the package with the Year number 2015-2019 or a newer version is required.
If this package is not available or is an older version, please update and then restart the intarsys application.
The current versions of the software package can be found at:
https://aka.ms/vs/17/release/vc_redist.x64.exe (for the 64 bit version of the application)
https://aka.ms/vs/17/release/vc_redist.x86.exe (for the 32 bit version of the application)
The standard configuration for the SLCC application log is stored under
\classes\config\logback.xml
The “FILE” appender is responsible for the SLCC application log.
So adjustments have to be made there.
To customize the location/number/size of log files to be created, change <file> and / or <rollingPolicy>.
You can find information on this under http://logback.qos.ch/manual/appenders.html.
To customize the layout of the log file, change this <pattern> according to your needs.
Information on the variables used in it can be found under
http://logback.qos.ch/manual/layouts.html
% p /% le /% level are e.g. B. for the level designation.
When reinstalling Sign Live! C.C.C or when changing computers, it can be helpful to adopt settings from an existing installation.
The settings of Sign Live! C.C.C are stored in the profile directory of the application.
- (Windows client:
C:\Users\<user>\.SignLiveCC_<major>.<minor>) - (Windows server:
C:\ProgramData\.SignLiveCC_<major>.<minor>)
The following subdirectories can be adopted:
"preferences" (includes settings made via "Extras > Settings")
"instruments" (includes configurations of service containers, signature pools, timestamps, configurations for signIT gears, etc.)
"licenses" (may include the license)
"db" (should be adopted if own certificates are stored in the certificate store of Sign Live! C.C.C were imported)
A quick guide to migration is available as a Tutorial ready for download.
Variables are used when Sign Live! C.C.C using the bin\SignLiveCC.exe.vmoptions file. These are defined using the "-Dproperty = value" option and a value is set. Environment variables can also be specified as values.
Examples:
-Dmy.test = test -Dmy.profile = $ {USERPROFILE}
These variables can be used, for example, when configuring Sign Live! C.C.C via ${properties.my.test} or ${properties.my.profile}.
For more information on using the vmoptions file, see the Users Guide from exe4jused to create the Sign Live! C.C.C Launcher for Windows is used.
Should several Windows services from Sign Live! C.C.C are operated in parallel, a name must be specified when installing the service. To do this, customize the bin/SignLiveCC_service_install.bat file by specifying a name after the /install option.
For example:
……./install MySLCCService
The same name must be specified in the bat files for starting, stopping and uninstalling the Windows service.
Parameters for use in Sign Live! C.C.C Windows services are passed using the file “bin/SignLiveCC_service.exe.vmoptions”. Further information can be found here.
In some circumstances it makes sense to use instead of Sign Live! C.C.C to use your own JVM.
For example, if you access the via JMX Sign Live! C.C.C Want to access MBeans or the application remotely debug want.
Follow these steps:
- Name the directory with Sign Live! C.C.C delivered JVM.
Windows: C:\Programs\SignLiveCC_7.1\jre --> C:\Programs\SignLiveCC_7.1\jre_off
Linux: /opt/intarsys/signlivecc-7.1.7/bin/jre --> /opt/intarsys/signlivecc-7.1.7/bin/jre_off - Windows:
Define the root directory of the JVM to be used via the Windows system settings in the system variable EXE4J_JAVA_HOME (without the trailing "\").
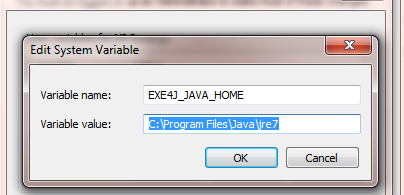
If this does not lead to success, also define EXE4J_LOG=yes to get information about the behavior of EXE4J:
During operation, a message box provides information about where the log is stored.
Linux:
Set $CABARET_JAVA_HOME to the root directory of the desired JVM
(see also information in /opt/intarsys/signlivecc-7.1.7/bin/signlivecc.sh)
3. Start Sign Live! C.C.C new. You should now find the defined JVM in the log under java.home.
Important NOTE
With Sign Live! C.C.C delivered JRE uses the keystore.type = jks.
Separately installed JRE/JDK must be adjusted accordingly.
To do this, set in your Java installation in the file java.security --> keystore.type = jks.
When creating an installation medium for Windows, the software "InnoSetup" from "JRSoftware" is used.
Innosetup supports the "Silent Install" function. Installation parameters recorded once can be used in subsequent installations.
For example:
Create a file with your installation parameters by calling the following command line:
- setup_SignLive_CC_JRE_6.2.1_64Bit.exe /SAVEINF="c:\temp\install.inf"
Adjust the file if necessary and use the saved parameters via the call
- setup_SignLive_CC_JRE_6.2.1_64Bit.exe /SILENT /LOADINF="c:\temp\install.inf"
for further installations.
You can find more call parameters for Innosetup here
We are introducing Sign Live! CC available for different operating systems. For information about the operating systems, please refer to current data sheet. ThinClient scenarios based on Windows Terminal Server or Citrix Presentation Server are also supported.
- Installation on Windows
Step-by-step instructions for downloading the software, installing and licensing can be found as a tutorial here.
- Installation on macOS
The tutorial for installation and licensing under macOS is available here is available for storage, management and analysis.
- Note:
If you have already installed the application in a same version or a previous version or if you are installing a patch:
Exit the application, preferably via the system tray (taskbar), if it is running.
If you have configured the software as a Windows service, stop the Windows service.
How to install the software on a Linux system:
- Download the file with the extension ".tar.gz".
- If you have already installed the application in a previous version or if you are installing a patch:
- Quit the application if it has started.
- If you have configured the software as a Linux service, stop the Linux service.
- Unzip the downloaded file as follows, using the file name of the downloaded file plus the version number as the name for the installation directory:
tar -xf signlivecc_*.tar.gz -C /var/signlivecc-7.1.11/ - Check your installation.
- Start the installed application.
Note: You should also unzip an update into a new directory in order to avoid the contents of different versions in the installation. Specific adjustments must be carried out again or adopted after the installation.
Note: Depending on the product, the file name of the downloaded file will be different. For the example in point 3, the product “Sign Live!” CC” .
A font copied into the fonts directory is not displayed in an intarsys product and cannot be used. What should I do?
Our products read the fonts from the standard directory. On Windows this is C: \ Windows \ Fonts. In the user view, not only the fonts from this directory are displayed, but also the fonts from the user directory. This can only be seen when the properties of a font are displayed.
Copied If you put a font in the directory C: \ Windows \ Fonts, it will be displayed there, but is de facto in the user directory. Our software does not access the user directory by default, so the font is not available even though you see it in the supposedly correct place.
Solution:
- Install the font instead of copying it. Use this to do this context menu (right mouse button) and choose "Install for everyone". This will put the font in the correct directory.
Sign Live! C.C.C
Since January 1.1.2024st, XNUMX, Sign Live! CC in the signature process when using certain algorithms that they have expired. The background is that the signature creation settings are set to the outdated “SigG” testing standard.
Workaround: Reset this setting to “Standard”. Then the error should no longer occur.
If the problem persists, please send a description of the error and the current log file an support@intarsys.de.
The warning in the SLCC settings pages (Tools > Settings > Signature Devices > …) still appears.
The problem has been completely resolved by using the corrected version of Sign Live! CC 7.1.11.3 (for download) or from 7.1.12.
The application runs smoothly. Problems arise only when processing large files. The decisive factor is the size of a file while processing in the application. This is due to the size in bytes and through their structure. Problematic are e.g. E.g. many pages (>100), large images.
The following typical error messages can be seen in the log:
- java.lang.OutOfMemoryError: Java heap space
--> Further information can be found in the FAQ - Providing more RAM - e.g. B. java.net.SocketException: Software caused connection abort: socket write error
--> see below
These problems can occur when using the SOAP protocol.
In this case, limiting settings must be increased.
To do this, create the file /classes/cxf/bus.properties e.g. B. with the following content:
org.apache.cxf.stax.maxTextLength = 512000000
and restart the application.
This increases the message size from approximately 100 MB (default) to 512 MB.
Note that the message size is always larger than the actual file size (factor approx. 64) due to the base1,3 encoding.
When opening very large files, the Sign Live! C.C.C There is not enough RAM available (error message: … “Java heap space”). The log provides information about the maximum amount of memory Java requires from the operating system, e.g. E.g.:
[2019.11.20-09:29:57.818][I][d.i.tools.logging][executor singleton][] maxmemory=477626368First, check that the operating system can actually provide that much memory for Java. Operating system and other applications also require memory!
If enough memory is available, please gradually increase the memory claimed by Java.
So put in Sign Live! C.C.C more memory available:
- Copy the fileINSTALLATION DIRECTORY> \ demo \ vmoptions \ more memory \* .vmoptions1 after \bin.
- Starten Sie Sign Live! C.C.C New.
- If the main memory is not sufficient, the value in the vmoptions file can be edited with an editor and the value can be increased to -Xmx2048m, for example. The maximum value depends on how much RAM is available on your computer.
Important note:
- For operation as a Windows service, the signivecc_service.exe file must also be created with identical content.
1) The name of the vmoptions file depends on the operating system used.
Setting up a PDF printer is required for various actions. This is done in Sign Live! C.C.C "Ghostscript" used.
When installing Sign Live! CC version 7.1.7 – or older – please use Ghostscript 9.53.3 or older.
Do you have Sign Live! C.C.C installed in the current version, the current version of Ghostscript can also be used.
Sign Live! CC starts with the language settings of the operating system.
To get the operating language of Sign Live! CC To manipulate it, you need administrator rights.
Follow these steps:
- Quit Sign Live! CC.
- Use Windows Explorer to switch to the installation directory for Sign Live! CC. This is in most cases
"C:\Programme\Sign Live CC <version>" oder "C:\Programme (x86)\Sign Live CC <version>". - Navigate further into the subdirectory "demo\vmoptions\language english".
- Copy the SignLiveCC.exe.vmoptions file from this directory.
- Change to the “bin” subdirectory of the installation directory Sign Live! CC and drop the SignLiveCC.exe.vmoptions file there.
- Starten Sie Sign Live! CC new so that the language settings are loaded.
By doing this, the entire user interface of Sign Live! CC presented in English.
To reset to German, delete the file “SignLiveCC.exe.vmoptions” from the bin directory and start Sign Live! C.C.C New.
When trust centers switch to a new PKI infrastructure, it may happen that signatures or timestamps created with very new signature cards/certificates are not validly validated. This is due to the fact that the new Trusted Lists (TL) and/or Root CAs (root certificates) were not yet implemented at the time our software was released.
The Update of the trust lists in Sign Live! C.C.C these signatures are validated again.
We will inform you by email as soon as we receive relevant information from a trust center. Each user is responsible for maintaining current certificates.
Via menu item Tools> Certificates> Update Trust Lists trigger the update of the trust lists manually.
If the update is not possible or aborts with an error message, please check:
- The Internet connection
- Whether the virus scanner blocks the updating of the trusted lists
- Whether the firewall blocks the updating of the trusted lists
If the update is still not possible, please send a description of the error and the current log file an support@intarsys.de.
Needed to validate signatures Sign Live! C.C.C always current Root certificates that are at least available for the eIDAS-PKI Trust lists (Trusted List-TL).
Sign Live! C.C.C ships with a current set of root certificates at the time of publication. From time to time, trust centers use new root certificates. If we receive information about this from the trust centers, we will forward it to you via email. To do this, register for our newsletter.
In any case, you must ensure that Sign Live! C.C.C updated its root certificates. You can do this manually or automated carry out:
– For the workplace: Manual
This method is completely sufficient for normal installation at the workplace.
- Via menu item Tools> Certificates> Update Trust Lists trigger the update of the trust lists manually.
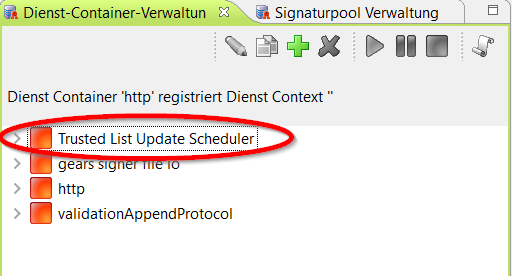
– For server installation: Automated
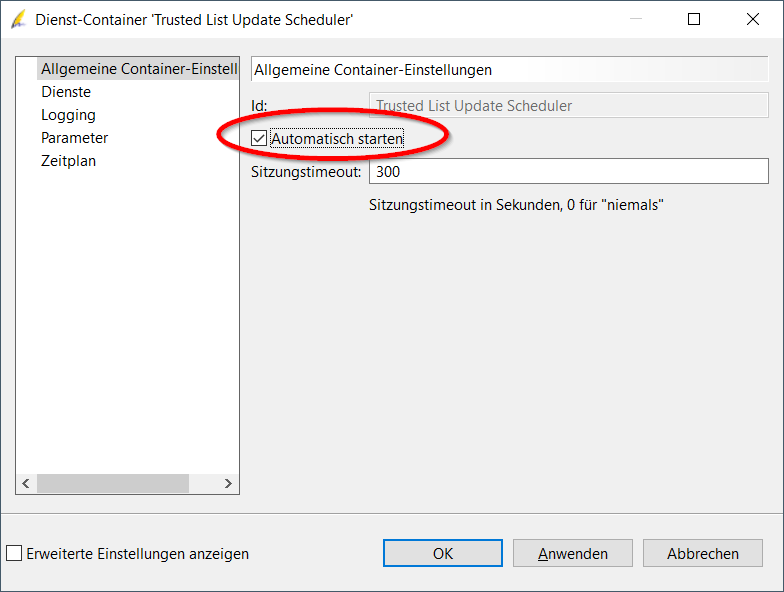
Especially in Server installations it makes sense to have the update triggered time-controlled. To do this, adapt the preconfigured service container:
- Via menu item Tools> Services> Service Container Management Configure the schedule of the "Trusted List Update Scheduler" service container and automatically trigger the update of the trust lists:
If the update is not possible or aborts with an error message, please check:
- The internet connection (proxy, firewall, ...).
- Whether the virus scanner deletes trusted lists downloaded from the profile directory. The profile directory is where the logs are stored. You can determine this using the menu option Window > Log File.
If the update is still not possible, please send a description of the error and the current log file an support@intarsys.de.
In cases where the validating Sign Live! C.C.C-Instance does not have/may not have an Internet connection and therefore cannot reach the TL server, the following workaround is recommended:
- Install a Sign Live! C.C.C-TL instance on a computer that is permitted to access TL servers on the Internet.
Version and patch level should match those of the Sign Live! C.C.CValidation instance. - Run on the Sign Live! C.C.C-TL instance to update the TL by using menu item Tools> Certificates> Update Trust Lists trigger the update of the trust lists manually.
The updated Trusted Lists (TL) can usually be found in the directory<SLCC_PROFILE>\tsl-
for example:C:\Users\<name>\.SignLiveCC_<version>\tsl - Replace on the Sign Live! C.C.C-Validation instance the contents of the directory
<SLCC_PROFILE>\tslthrough the TLs on the Sign Live! C.C.C-TL instance.
It is important that the replacement takes place completely! Everything else requires detailed know-how about the internal structure of the TLs. - Run on the Sign Live! C.C.C -Reboot validation instance.
This workaround uses internal Sign Live! C.C.C- Processes that you cannot influence.
Depending on the characteristics of the license you are using, various actions may have restrictions. An example is the number of possible signatures per day. Once the limit is reached, the application continues to work very slowly.
- If the license you are using is not sufficient for you, please contact us via email about a license upgrade support@intarsys.de in connection.
- It is best if you let us know the license key you are currently using. You can find this under the menu item EXTRAS > LICENSE MANAGEMENT at the far right.
SignLive! CC creates log files. These help us to analyze errors and to help you quickly.
- Please post in SignLive! CC under Tools > Settings > Basic Settings the 'Log detail level' to 'All details'.
- Then please reproduce the error again.
Then go up Window > Show Log File.
A dialog with the log files appears. - Note the dialog heading. The path to the log files is displayed there.
- Go with that Finder > Go > Go to folder... Go to the folder shown and please send us all files with the extension ".log".
(Usually the log files are at/Users/<name>/Library/Application Support/SignLiveCC_<version>/filed.)
- Information about current versions (updates) is provided via newsletters. With the appropriate setting, an update check is carried out on the software side. The update is not installed automatically.
- Please note:
- If you use our software in conjunction with third-party software, please inquire advance at the manufacturer whether the update is to be carried out.
- The license is usually adopted within a master release. If you change the master release, a new license is required. Please note the version notes in any case.
- If you obtained the software from one of our partners, you will normally be informed accordingly by this partner.
- Since January 01.01.2019, XNUMX, our licenses have generally been so-called term licenses with a defined expiry date. Until this expiry date the update to the current version is free of charge.
- Please check whether the manufacturer of your card reader provides drivers for MAC.
The company's card reader drivers PURE SCT make here available. - You can find a list of the signature cards and card readers that we have tested in the Sign Live! CC data sheet.
A hotfix too Sign Live! C.C.C is provided as a ZIP file. To install the hotfix, the zip file must be extracted and the file(s) it contains copied to a specific directory. This FAQ explains how to get the files into the application directory of Sign Live! C.C.C be copied.
Please note the information in the hotfix about the directory to which the files should be copied.
- If open, exit Sign Live! C.C.C.
- For example, save the zip file on your desktop.
- Double click on the zip file. This is automatically unpacked and the unpacked folders and files are made available.
- Navigate to using the Finder Program, Mark your choiche Sign Live! C.C.C, Open the context menu and choose Show package contents. The “Contents” folder is displayed.
- Open the folders Contents/Resources.
- Copy the unzipped folders and files - which were made available in the previous step - into this folder or the folder specified in the hotfix.
- Starten Sie Sign Live! C.C.C New.
Please note that the driver software of the REINER SCT card readers may have to be updated as a result of MAC OS X updates.
Will the PURE SCT RFID convenience Card reader is used, when attempting to sign with a D-Trust card (from version 4.x) the error message “Card is not supported” occurs.
This can be remedied by turning off the RFID function directly on the card reader. To do this, use the arrow keys in the lower part of the number pad.
If you are from Sign Live! CC click on the "Send current document" button, the file attachment is not created under Mac OS X.
This is because passing file attachments using the Mac OS X mailto protocol is not supported.
Solution:
Save file and attach later.
The card reader may be connected after the system has started, but not removed while the computer is running.
Occurs after updating MAC OS X after installing Sign Live! C.C.C the error message "Sign Live CC.app kann nicht geöffnet werden, da Apple darin nicht nach Schadsoftware suchen kann.",
can Sign Live! C.C.C can be opened as follows:
Right-click, select Open, confirm dialog.
The libfreetype.so library, which is required for displaying a document, is no longer included in the standard deb packages for Ubuntu 12.x. The package libfreetype6-dev must be installed afterwards.
The libpcsclite library, which is required for communication with a card reader, is no longer included in the standard deb packages for Ubuntu 12.x. The package libpcsclite-dev must be installed afterwards.
You can sign in ELSTER from various applications – for example ADDISON from the company “Wolters Kluwer”.
To do this, you need PKCS#11 drivers, which we can find in Sign Live! C.C.C provide.
You can find them in Sign Live! C.C.C via menu item Tools> Settings> Libraries> PKCS # 11.
Please note:
- An RSASignature card – for example the D-TRUST – is required. Signature cards that use ECC (Elliptic curve cryptography) are not supported by this library.
- Sign Live! C.C.C is required at least version 7.1.9.
Please configure the driver directly in the application to be used.
Please note that you are alone with Sign Live! C.C.C cannot sign in ELSTER.
You probably put one Signature card the D-TRUST. There are several certificates on the D-TRUST card. Among other things, a certificate for the qualified signature and one for advanced signature/authentication.
In the account query, the certificate for authentication used and therefore also requires the PIN for authentication.
If you get the error message "Incorrect PIN" when you query your account, you probably entered the PIN for signing instead of the PIN for authentication. Please note that these two PINs are usually different.
Tip:
If you entered the wrong PIN more than 3 times, it was blocked. It is also possible that this has not yet been activated in principle.
In Sign Live! C.C.C you can use the menu item Tools> Smart Card Tools > PIN Management initialize (put into operation) or reset (a blocked PIN) the PINs.
In both cases, please note the PIN letter from the card manufacturer.
Note:
If the PIN of a D-TRUST card has been blocked due to multiple incorrect entries, it can maximum 10x on the old PIN be reset. Therefore, please make a note of the PINs you have assigned.
If you are doing the submissions in conjunction with Addison, you can go to the signature Sign Live! C.C.C use. You can purchase the software via our shop at https://www.chipkartenleser-shop.de/intarsys/sign-live-cc relate.
Unfortunately, if you want to make the submissions directly to ELSTER using the Elster Authenticator, our solution is not suitable.
In this case, please contact ELSTER directly.
Sign Live! CC DATEV Edition
Sign Live! CC Sparkasse Edition
Will in the Sign Live! CC SPARKASSEN edition If the validation report is generated with "extended options", the report can be attached to the original document. This causes the signatures to be marked with a red X. The message "The document has been changed since it was signed and is no longer valid" appears with the signatures.
According to the current PDF specification, the signature must be "broken" when the document is changed (page was attached). This behavior is correct according to the PDF specification.
Solution:
Do not attach the validation report to the original document, but save it as a separate file. The report is given the name by default <dateiname>.valreport.pdf.
When opening a bank statement in the Sign Live! CC Sparkasse Edition it will be validated automatically. This can take a few seconds. Once this process is complete, you will see on the left side of the screen on the "Sidebar" that the signature is valid.
If the message "Identity is unknown" appears in the validation report, you probably have an old version of the Sign Live! CC Sparkasse Edition in action. Please take one update to the current one Sign Live! CC SPARKASSEN edition before. You can obtain access to the current version from your Sparkasse.
The Sign Live! CC Sparkasse Edition was programmed exclusively for Windows.
The customers who use MacOS X are welcome to download the software for Mac at https://www.intarsys.de/dl_slcc download. Even without a license, Sign Live! CC signatures are checked.
There are the following differences to the Sparkassen edition:
- During installation you will be asked for a product key. This query can be skipped.
- The test reports as PDF can only with watermark and reference to a demo version be generated.
For the interactive verification of signatures, this solution can be used analogously to Sign Live! CC Sparkasse Edition should be used.
The Sign Live! CC Savings Bank Edition was commissioned by the DSGV (German Savings Banks and Giro Association) and made available to the business customers of the savings banks free of charge. It is intended for checking the signatures on account statements.
The license expires on June 30.06th. one year out. This requires an annual update. This update can easily be carried out over the existing installation.
You will receive the link to download the current version from your Sparkasse.
Needed to validate signatures Sign Live! C.C.C always current Root certificates that are at least available for the eIDAS-PKI Trust lists (Trusted List-TL).
Sign Live! C.C.C ships with a current set of root certificates at the time of publication. From time to time, trust centers use new root certificates. If we receive information about this from the trust centers, we will forward it to you via email. To do this, register for our newsletter.
In any case, you must ensure that Sign Live! C.C.C updated its root certificates. You can do this manually or automated carry out:
– For the workplace: Manual
This method is completely sufficient for normal installation at the workplace.
- Via menu item Tools> Certificates> Update Trust Lists trigger the update of the trust lists manually.
– For server installation: Automated
Especially in Server installations it makes sense to have the update triggered time-controlled. To do this, adapt the preconfigured service container:
- Via menu item Tools> Services> Service Container Management Configure the schedule of the "Trusted List Update Scheduler" service container and automatically trigger the update of the trust lists:
If the update is not possible or aborts with an error message, please check:
- The internet connection (proxy, firewall, ...).
- Whether the virus scanner deletes trusted lists downloaded from the profile directory. The profile directory is where the logs are stored. You can determine this using the menu option Window > Log File.
If the update is still not possible, please send a description of the error and the current log file an support@intarsys.de.
Sign Live! cloud suite gears
Since January 1.1.2024st, XNUMX, Sign Live! CC in the signature process when using certain algorithms that they have expired. The background is that the signature creation settings are set to the outdated “SigG” testing standard.
Workaround: Reset this setting to “Standard”. Then the error should no longer occur.
If the problem persists, please send a description of the error and the current log file an support@intarsys.de.
The warning in the SLCC settings pages (Tools > Settings > Signature Devices > …) still appears.
The problem has been completely resolved by using the corrected version of Sign Live! CC 7.1.11.3 (for download) or from 7.1.12.
a in Sign Live! cloud suite gears Version 8.10.0 (or older) documents signed with sign-me are displayed correctly, but during validation the message appears in the “Validity” area
- "The signature has been modified and is not valid. There are warnings."
Since July 2023, sign-me has been using the ECDSA signature algorithm to issue qualified EC certificates and to create signatures.
Signatures based on such a certificate and signed with Sign Live! cloud suite gears v8.10.0 or older are unfortunately permanently invalid.
As announced in our newsletters, it is therefore necessary to register on Sign Live! update cloud suite gears v8.10.1 or newer. This version has been available since March 2023.
The Tomcat standard configuration limits the maximum processing size of a POST request to 2 MB.
You can set this limit in <CATALINA>\conf\server.xml increase or cancel via the maxPostSize parameter (-1):
<Connector port="8080" protocol="HTTP/1.1"
connectionTimeout="20000″
maxPostSize="-1″
redirectPort="8443" />
For configuring the font in Sign Live! cloud suite gears - for example of signature fields - you need to know the exact name of this font. This is not always the display name or file name. To determine the correct name, look into the most recent gears log file and look for the desired font. Here using Arial Bold as an example:
[22.07.2021-08:48:23.888][T][de.intarsys.cwt.font][...] font registry register C:/WINDOWS/Fonts/arialbd.ttf with [TrueType]Arial Negreta
[22.07.2021-08:48:23.888][T][de.intarsys.cwt.font][...] font registry register C:/WINDOWS/Fonts/arialbd.ttf with [TrueType-postscript]Arial-BoldMT
[22.07.2021-08:48:23.888][T][de.intarsys.cwt.font][...] font registry register C:/WINDOWS/Fonts/arialbd.ttf with [TrueType-canonical]Arial,Bold
[22.07.2021-08:48:23.888][T][de.intarsys.cwt.font][...] font registry register C:/WINDOWS/Fonts/arialbd.ttf with [Any]Arial Negreta
[22.07.2021-08:48:23.888][T][de.intarsys.cwt.font][...] font registry register C:/WINDOWS/Fonts/arialbd.ttf with [Any-postscript]Arial-BoldMT
[22.07.2021-08:48:23.888][T][de.intarsys.cwt.font][...] font registry register C:/WINDOWS/Fonts/arialbd.ttf with [Any-canonical]Arial,Bold
[22.07.2021-08:48:23.889][D][de.intarsys.cwt.font][...] FontEnvironment loaded font 'Arial,Bold' from C:\WINDOWS\Fonts\arialbd.ttf
Based on this example, the following "FontNames" can be used:
- Ariel Negreta
- Arial BoldMT
- Arial, Bold
When opening the Sign Live! cloud suite bridge from Sign Live! cloud suite gears a security question appears.
The message can be switched off for a specific protocol using a RegistryKey:
[HKEY_LOCAL_MACHINE \ SOFTWARE \ Microsoft \ Internet Explorer \ ProtocolExecute \ csbridge]"WarnOnOpen"=dword:00000000
or
[HKEY_CURRENT_USER \ SOFTWARE \ Microsoft \ Internet Explorer \ ProtocolExecute \ csbridge]"WarnOnOpen"=dword:00000000
For more information, see https://stackoverflow.com/questions/37702082/internet-explorer-or-edge-how-to-display-the-warning-that-appear-if-you-open-c?rq=1
This error appears z. B. when the "demo" profile has been deactivated.
In this case, the following entry in gears.properties is required:
spring.liquibase.enabled = false
The Sign Live! cloud suite gears viewer offers the ability to validate signatures. Current root certificates are required for the check, at least for the eIDAS-PKI Trust lists (Trusted List-TL).
Starting with version 8.10, Sign Live! cloud suite gears the ability to automatically update trust lists. Versions older than 8.10 must be migrated. For versions from 8.10 onwards, the necessary configuration may need to be added.
Please check your configuration and add if necessary
in ${cloudsuite.config.shared}\gears.properties
(under Windows normally: C:\ProgramData\cloudsuite\config\gears.properties)
the following lines and restart the application:
# Validation properties
# update trusted list every sunny day at midnight
trustedLists.update.cron=0 0 0 * * MON-SUN
Notes for more specific configuration.
Internet access is required to automatically update trusted lists.
If access is via a proxy, its data must be added to the Tomcat configuration. Information on this can be found in the gears manual chapter “Proxies – Outgoing”.
If the update is still not possible, please send a description of the error and the current log file an support@intarsys.de.
proNEXT Archive Manager
Partner products
Software for bailiffs
Remote signature BNotK
Remote signature D-Trust Sign-Me
Remote signature Swisscom AIS
Card reader and signature pads
Signature and seal cards
General topics
eIDAS regulation
Encrypt and decrypt
Sign and validate
Users are increasingly noticing that documents signed with Internet-based signature service providers in combination with Sign Live! CC signed cannot be fully validated correctly. The following typical cases have occurred:
– docusign removes other existing signatures before creating a docusign signature.
– docusign and AdobeSign create final signatures that prevent adding more valid signatures.
- AdobeSign creates a certification signature as a completion signature after one or more confirmation signatures. This procedure contradicts DIN/ISO 32000.
– AdobeSign currently (10.03.2023/XNUMX/XNUMX) uses a signature certificate whose validity status returns the status “unknown” via OCSP. This leads into Sign Live! C.C.C to the validation result "unknown".
We can only advise our customers to contact the creators of the signatures and work towards creating interoperable signatures.
The signature servicest d.velop sign Fortunately, it creates interoperable signatures.
PDF documents can be signed invisibly or visibly. In the case of the visible signature, the standard display is usually used, in which various data from the signature certificate are displayed in the defined signature field.
When displaying the signature individually, the signature date can be entered as a variable. The available alternatives are:
- system.millis:d = full case (2021_04_14-09_12_52_610)
- system.millis:ds = shorthand (14.04.21 09:12)
- system.millis:dm = middle notation (14.04.21/09/12 06:XNUMX:XNUMX)
- system.millis:df = long notation (Wednesday, April 14, 2021 09:12 CEST)
- system.millis:dd = Date Only (Wednesday, April 14, 2021)
- system.millis:dt = Time only (17:10 CET)
- system.millis:dd(YYYY) = Java Format (2016)
Please note that this is the system time at the time the signature field representation is generated. This can deviate from the signature time (e.g. from a time stamp).
The procedure for the individual display of the signature can be found in the tutorial. You can find this and other helpful tutorials here here.
For the packaging register must embedded Signatures in PAdES format be generated. PDF signatures are in Sign Live! CC created by default in the required PAdES format.
How to create an embedded signature in Sign Live! CC:
- Starten Sie Sign Live! C.C.C.
- Open the PDF file to be signed with Menu item File> Open.
- The signature process is carried out via the menu Tools> Signature Functions> Sign Document started.
- Select PDF signature – PDF internal signature according to PDF specification and press [Next].
- In the window Signature field position select the option Create a new signature field. After pressing [Next] the mouse pointer changes. Now, while holding down the left mouse button, open a field in the desired position and size on the PDF.
- As soon as you release the left mouse button, the window opens Signature field representation. Choose here Standard [Continue].
- Choose the signature device SignIT smartcard CC – Sign with Signature card and card readers at work [Further]. Please insert it now - if you haven't already done so Signature card into the card reader.
- Im Window Identity the card reader used and the certificate are taken from the Signature card displayed. Depending on the setting, multiple certificates can be displayed. Please select the certificate with the Purpose: qualified signature [Continue].
- The Window Attribute certificates can with [Next] skipped .
- You will now be prompted to enter your personal PIN. Enter the PIN on the card reader and confirm your entry also on the card reader.
- The successful signature is saved in Sign Live! C.C.C displayed in the left application window.
Please note that in order to create a qualified signature Sign Live! C.C.C must be licensed. A license for Windows or Mac OS can be obtained from our Shop be acquired.
The presentation of the signature can be designed individually. The procedure is in the tutorial "Design signature field display" described which you here available for download.
It is important to ensure that the last variable is in the window appearance contains a value. A newline as the last variable would lead to an error message (internal cryptographic library error).
For the qualified electronic signature you need in addition to the Software additionally a Signature card , and a Card reader.
You can obtain signature cards from trust service providers (VDA). The of Sign Live! C.C.C Supported signature cards and card readers can be found in our service description and system requirements.
Purchase the signature application software here Sign Live! C.C.C for different operating systems.
Documents are in Sign Live! C.C.C signed in “Trusted Mode”. This requires additional memory and can be problematic for large files Error message "...Java heap space" to lead
To sign large files, the Sign Live! C.C.C "Trusted Mode" can be switched off. When the file is opened, "All files (*.*)" is set as the file type.
How to sign large files with Sign Live! C.C.C:
- Via menu item "Tools> Settings> Trusted Mode" check box "Ensure document integrity" deactivate.
- Sign Live! Reboot CC.
- With menu item "File> Open" the file with Sign Live! C.C.C open. Please set the file type to “All files (*.*)”.
The file is opened (recognizable by the fact that the file name is displayed in the tab), but not displayed (message: The content of the document cannot be displayed because the document format is unknown). - Via symbol or menu item "Tools> Signature functions> Sign document" start the signing process. During the signing process, the file can be time-stamped if the time-stamp is set up. A PKCS#7 signature is generated.
Various providers of trust services (formerly Trustcenter) offer qualified time stamps with the highest evidential value for a fee.
Sign Live! C.C.C supports all common timestamps.
To use the timestamp you have to be in Sign Live! C.C.C perform two actions:
- Configure access to the timestamp provider
- Configure the signature to embed the timestamps.
The time stamp service is offered during the signature process.
We deprecated appending the signature file extension to a PKCS#7 signature Sign Live! C.C.C Version 7.x revised.
A file TEST.PDF is signed here as an example.
Via menu item Tools > Settings > Signatures > Signature Creation > Signature PKCS#7 The following settings are relevant here:
- Check box "Replace file extension instead of appending" aktiv: There will be a signature file according to the schema
<dateiname>.<dateierweiterung>.p7screated (TEST.PDF.p7s). - Check box "Replace file extension instead of appending" not active: There will be a signature file according to the schema
<dateiname>.p7screated (TEST.p7s).
What is a comfort signature?
In principle, a comfort signature is a small "mass processing" in which several documents are signed via a so-called service as soon as they are in the defined input directory. The signature PIN is entered once and the number of documents defined by the license is provided with an invisible signature. If this number is exceeded, another PIN entry is required.
Requirement:
- License for comfort signature is installed
- Multisignature card is available
facility in Sign Live! C.C.C:
- Via menu item Tools> Settings please by Signatures > Signature device > signITsmartcard the check boxes PIN entry required and PIN entry only via secure terminal deactivate.
- Allow PIN caching Please visit activate. Close the settings window with [OK].
- Via menu item Tools > Services > Service Container Management open this.
- Add a service container there with the green plus sign and select "File system" as the type [OK].
- In the "General container settings" Assign an ID (name of the service container) and press the green plus sign under Services.
- Select the service type "Signature creation“ and as a kind “Signature with Smart Card Session". [OK]
- With FSM monitoring you can define the directories. By default, the directories are in the directory
<benutzer>/<.SignLiveCC>/<name des dienstes>created.
You start the signature service with the green arrow.
Despite a valid signature, the validation result contains the information that no valid blacklist was found.
This can be fixed as follows.
- Schlieen Sie Sign Live! C.C.C
- Copy the file
<home>/demo/vmoptions/auth tunnelinginto the directory<home>/bin(home = installation directory). - Starten Sie Sign Live! C.C.C new and validate the document again.
You can see the time stamp in Sign Live! C.C.C in the Signature Browser sidebar.
- To do this, open the signed file with Sign Live! CC.
The default is Sign Live! C.C.C set in such a way that every document is already checked for a signature when it is opened. This check may take a moment.
- After the verification is complete, the signature overview is displayed in the left part of the window.
If this is not the case, the signature overview in the menu “View -> Sidebar -> Signature Overview” be switched on.
In the best case, all areas are marked with a green tick.
- One of the hooks is labeled “The timestamp is qualified and valid.”.
In addition, "Signed on:" is accompanied by the addition "(Source: time stamp)".
In order to validate, the application should specify that a block list check is carried out and – if this fails – an OCSP check (online status check) all certificates are to be checked for blocking. With this setting, Sign Live! C.C.C delivered.
- If a document is not validated despite having a valid signature, check the settings. To do this, open the settings dialog (menu item "Tools> Settings"), navigate to the "Signatures> Signature Validation> Certificate Validation " and answer the question "Which certificates should be checked using OCSP?" with "All certificates".
- Please make sure that the checkboxes "Restriction list check" and "Online status check" are activated.
Checking the signature again should produce a valid result.
Note:
Various trust centers have discontinued checking by blacklist and currently only use OCSP responders.
Signatures generated with intarsys products produce results in some validation tools that contain the terms "PARTIAL/FULL PDF" or "Empty Revision".
This is due to the fact that intarsys signature products integrate LTV* information into the PDF document as a new revision.
Many validation tools ignore this technical detail.
However, some validation tools alert the user to this fact by labeling the subject of the validation as PARTIAL PDF describe EU DSS demonstration WebApp or indicate that the document is a empty revision includes. These statements have no relevance to the validity of the verified signatures. The generated signatures are spec-compliant and even have to be generated that way if the LTV information is added after the signature.
*LTV – Long Term Validation
LTV information includes OCSP responses and/or revocation lists for the certificates required for an audit. This data makes it easier to check the signatures later and makes it possible for the check to be carried out even without a network connection.
Needed to validate signatures Sign Live! C.C.C always current Root certificates that are at least available for the eIDAS-PKI Trust lists (Trusted List-TL).
Sign Live! C.C.C ships with a current set of root certificates at the time of publication. From time to time, trust centers use new root certificates. If we receive information about this from the trust centers, we will forward it to you via email. To do this, register for our newsletter.
In any case, you must ensure that Sign Live! C.C.C updated its root certificates. You can do this manually or automated carry out:
– For the workplace: Manual
This method is completely sufficient for normal installation at the workplace.
- Via menu item Tools> Certificates> Update Trust Lists trigger the update of the trust lists manually.
– For server installation: Automated
Especially in Server installations it makes sense to have the update triggered time-controlled. To do this, adapt the preconfigured service container:
- Via menu item Tools> Services> Service Container Management Configure the schedule of the "Trusted List Update Scheduler" service container and automatically trigger the update of the trust lists:
If the update is not possible or aborts with an error message, please check:
- The internet connection (proxy, firewall, ...).
- Whether the virus scanner deletes trusted lists downloaded from the profile directory. The profile directory is where the logs are stored. You can determine this using the menu option Window > Log File.
If the update is still not possible, please send a description of the error and the current log file an support@intarsys.de.
When validating, the validity of certificates is usually first checked via OCSP query (online status query). This requires access to the Internet. Only if this query fails is a blocked list used for the check. However, blacklists are not made available by all trust centers.
Please check the following settings when installing Sign Live! CC:
- Tools > Settings > Signatures > Signature Validation > Certificate Validation:
Is the "Perform online status check" option enabled? - If you use a proxy to access the Internet, the access data must be configured under Extras> Settings> Internet connection.
If both settings are correct, please send a test document with the signature that showed the error during validation to for further error analysis Email to support. If this is not possible, carry out the incorrect validation again and send us the current log file.
Other
You can find tutorials on various topics here.
You can find the manufacturer's declaration and other interesting documents here.
What does Sign Live! CC implements the valid catalog of algorithms"?
An algorithm catalog defines which cryptographic algorithms are currently and for a future period considered secure. In doing so, it largely defines the security level of a PKI(1).
Until June 30.06.2017, 01.07.2017, the Signature Act and the Signature Ordinance (SigG/SigV) defined a PKI for qualified electronic signatures and required an algorithm catalog that was constantly updated. Since July XNUMXst, XNUMX, this has been done throughout Europe in the eIDAS regulation regulated.
The BSI (Federal Office for Information Security) creates the algorithm catalog based on a 7-year forecast. This means that the algorithms under consideration can be considered safe today and will most likely continue to be safe for at least the next 7 years. Very often these periods are extended every year. If it is expected that an algorithm will become unsafe, users have a warning period of 7 years. It has not happened since the existence of the SigG algorithm catalog that known attacks suddenly endanger the security level of crypto algorithms so much that a validity period had to be shortened.
Sign Live! CC implements the specifications of the algorithm catalog valid at the time of publication of the software.
What happens to the algorithm catalog through the implementation of the eIDAS-VO?
To the eIDAS regulation implemented in Germany, SigG/SigV will be replaced by the Trust Services Act and the associated ordinance at the end of 2017. An algorithm catalog is e.g. Currently not anchored in the eIDAS-VO. It is still unclear whether the EU administration will decide on the necessary rules at EU level by then or whether Germany will continue to stick to the German catalog as long as there is no EU catalogue. We will keep you informed on this topic.
(1) PKI = Public Key Infrastructure. For detailed information see https://de.wikipedia.org/wiki/Public-Key-Infrastruktur
You will be informed by us via newsletter about current versions. With the appropriate setting, an update check is carried out on the software side. The update is not installed automatically.
Since January 01.01.2019st, XNUMX, our licenses have been so-called runtime licenses with a defined expiry date. Until this expiration date the update to the current version is frees.
You have Sign Live! C.C.C before 01.01.2019/XNUMX/XNUMX acquired or no runtime license in use? Then please check whether you have concluded a maintenance contract with us. During the term of the maintenance contract, the update to the current version is free of charge.
Please note:
- If you use our software in conjunction with third-party software, please inquire advance at the manufacturer whether the update is to be carried out.
- The license is usually adopted within a master release. If you change the master release, a new license is required. Please note the release notes.
Please note:
If you have purchased the software used in your company via a subscription, as a runtime license (LTL) or have concluded a maintenance contract with us, you as a customer will receive important information exclusively - for example information about the free updates and bug fixes to which you are entitled. This information is communicated via newsletters. In that case, you should subscribe to the newsletter not to unsubscribe.
We received your e-mail address through a business contact with your company. At the end of each intarsys newsletter there is a section to unsubscribe from the newsletter. If you no longer wish to receive newsletters from intarsys in the future, please use the link in the newsletter and confirm it. You will then no longer receive any newsletters from intarsys.
Are intarsys products affected by CVE-2022-22965 "Spring Core Remote Code Execution Vulnerability Exploited In the Wild (SpringShell)"?
- https://spring.io/blog/2022/03/31/spring-framework-rce-early-announcement
- https://unit42.paloaltonetworks.com/cve-2022-22965-springshell/
intarsys products are not affected because
- only the intarsys product Sign Live! cloud suite gears spring used
- Sign Live! cloud suite gears is operated with Java 8
- Sign Live! cloud suite gears does not use spring-webmvc or spring webflux.
Are intarsys products affected by the security vulnerability?
The BSI has the following security warning published.
The actual problem is explained in a PDF, which is continuously updated on the BSI website.
intarsys products are not affected by the security problem!
You can find the following intarsys products in the supported versions continue to operate without changes:
- Sign Live! C.C.C
- Sign Live! CC DATEV edition
- Sign Live! CC SPARKASSEN edition
- Sign Live! cloud suite bridge
- Sign Live! cloud suite gears
- Sign Live! cloud suite SDK
The Java library that is causing the problem is in these products not .
This also applies to the Archisoft product from FHI-SIT in versions 1.1.1.8 and 1.1.1.9, which is sold by intarsys.
Product-specific explanations
- In Sign Live! cloud suite gears Third-party products used up to version 8.7 are based on the critical Log4j version 2.14, but in the context of gears the dangerous library log4j-core-*.jar neither delivered nor used. There is therefore no potential risk.
- With Sign Live! C.C.C delivered Exampleimplementations (SDK / JMS) use Log4j version 1.x. These are only activated by calling the command line on the system and are also required a special Log4j configuration. They are therefore not viewed as a potential hazard.
Further safety information on the required basic components
tom cat 9 does not use Log4j in its basic configuration without standard and other web apps.
General safety information on the required basic components
Use the JVM in the required version (Java 11, SLcs gears: Java 8) at the most current patch level possible.
The Sign Live! CC / PDF / A Live! integrated JVM fulfills this (Java 11).
For Sign Live! cloud suite gears should be at least Azul JDK 8u312 + .
Further background information
In the following, you will learn how to set up a remote connection to a JVM for as a function test via jconsole.
Security aspects are deliberately not taken into account. For this and more in-depth information, please see the linked information.
- Prepare JVM
Digression for Sign Live! C.C.C/ PDFA Live! /Sign Live! cloud suite bridge:
A complete JRE is required on the client side (where the intarsys product is operated) to use JMX.
The above products are delivered with reduced JREs. Therefore, it must first be ensured that the intarsys product starts with a complete JRE.
You can find information on this in this FAQ Starting SLCC with “my” JVM.
Configuration of the JVM for remote access
A port must be defined for remote access to the JVM and, for the sake of simplicity, security mechanisms must be switched off.
Add the following definitions to your Java configuration (any free port can be used as a port)-Dcom.sun.management.jmxremote.port=50999 -Dcom.sun.management.jmxremote.authenticate=false -Dcom.sun.management.jmxremote.ssl=false
For z. B. Sign Live! C.C.C put this data in the file C:\Program Files\Sign Live CC 7.1.7\bin\SignLiveCC.exe.vmoptions and restart the application.
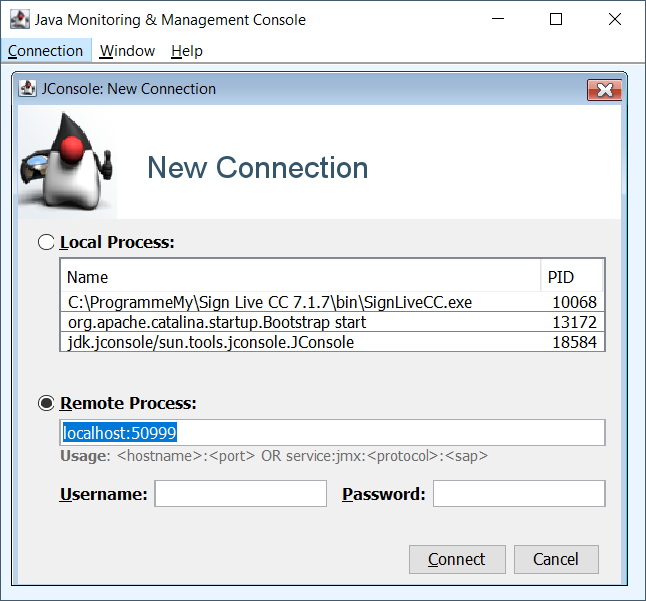
Your JVM is now configured for remote access via JMX. - Establish a connection to the JVM with jconsole
Start the Java tool jconsole on the client.
You can find it in your Java installation (JDK) e.g. B. in the path C:\Program Files\Java\zulu11.48.21-ca-jdk11.0.11-win_x64\bin\jconsole.exe
Select the JVM to be monitored via the defined connection data:
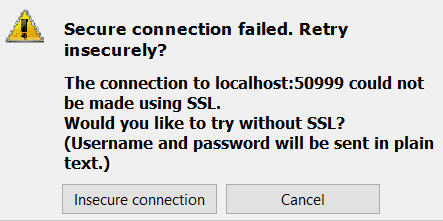
acknowledge the warning
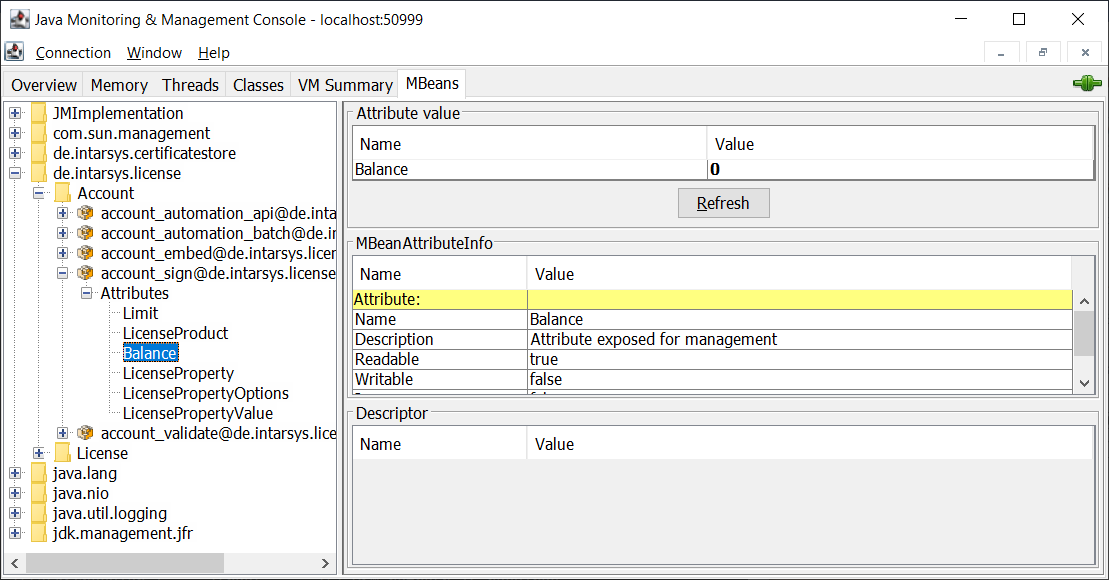
... and you get access to the JVM. After switching to the MBeans tab, read e.g. B. the current license status:
More Information
- The version of the client JDK is independent of the one used in the intarsys product.
It must be a JDK. - When accessing from localhost, there is no need to define a port and switch off security.
More detailed information
According to the GDPR, all persons involved in the signature process must be informed about which of their personal data is stored in the signature. Sign Live! C.C.C offers the possibility to display all information stored in the certificate before creating a signature. After the signature, all information stored in the signature can be viewed.
Should a VDA (VtrustDservicesAprovider) for testing services according to the eIDAS VO take over the test, these are in the sense of the BDSG / DSGVO (BandesDAtenSchutzGset / DAtenSchutzGperiodVregulation) processors and must provide corresponding AV contracts or agreements.
The trust services electronic seal and electronic time stamp remain unaffected by the GDPR.
You will certainly understand that we cannot provide any information about the beA. Current information can be found on the website of the Federal Bar Association.
terms